API Token Authentication in Laravel 5.2

I recently had the need to write a small url shortening application. I am aware that this problem has been solved quite a few times before, but what is being a developer if not reinventing the wheel just for the heck of it? Custom CMS anyone?
Knowing that this was going to be a tiny RESTful API and also knowing that Laravel 5.2 had API rate limiting built in, I was eager to give it a try. Taylor Otwell being Taylor Otwell shipped 5.2 with the rate limiting defaults set up out of the box and I had my application building out short url's in a matter of minutes. The problem for me came when I wanted to start associating those short urls with a user.
Typically my applications have a UI and authentication is done through a simple login page. Obviously for a RESTful API, having a login page isn't ideal. Instead, my hope was to have users append an api_token to the end of their query string and use that to authenticate their request. I was happy to find that 5.2 also ships with a TokenGuard(link) class that allows you to do exactly that, but the documentation on getting it to work was a bit thin, so here you go.

Set up Token based Authenticaton

1. Add an api_token

The first think you need to do is to add an api_token column to your userstable. If you are just starting your application you can likely get away with modifying the user migration that ships with Laravel to include your new column.
    // add this to your users_table migration
    $table->string('api_token', 60)->unique();
Note: Be sure to generate and assign an api_token to new users. Something like str_random(60) should be sufficient.

2. Wrap your routes

Second, we need to make sure that any routes that will be using Token Authentication are being protected by the auth:api middleware. Use the following route group as an example of what your routes might look like.
    Route::group(['prefix' => 'api/v1', 'middleware' => 'auth:api'], function () {
        Route::post('/short', 'UrlMapperController@store');
    });
Note: Typically when protecting routes from unauthenticated users, we use the auth middleware, but by appending :api to the end we are telling Laravel that we want to use the driver for the api guard which is set up in the config/auth.php and is defaulted to token.
At this point, any routes wrapped with your auth:api middleware are only accessible to those that visit the route with a valid api_token in their request.

3. Getting the User

To get the authenticated user for this API request, use the following snippet:
    Auth::guard('api')->user();
Just like when we called the middleware, we have to let Laravel know that we want the api guard instead of the default web guard.

Extras

In the App\Http\Middleware\Authenticate middleware, you might want to change the following lines:
Update: This has been merged into 5.2. Check out the current Authenticate Middlewarehere
    // Original
        if ($request->ajax()) {
            return response('Unauthorized.', 401);
        } else {
            return redirect()->guest('login');
        }

    // Updated
        if ($request->ajax() || $request->wantsJson()) {
            return response('Unauthorized.', 401);
        } else {
            return redirect()->guest('login');
        }
This will return a 401 status code to unauthorized API requests instead of redirect it to a login page.
Lastly, if you are planning on primarily using the TokenGuard to authenticate requests, change the default guard in config/auth.php to be api instead of web. That should prevent you from having to tell Laravel to use the api version of the middleware or guard since Laravel will use by default what you have set in config/auth.php.

Wrapping Up

Well there you have it, authenticating users to your api using nothing more than an api_token in the request and an api_token column on your user table. Hopefully this will save you the time it took me digging through the TokenGuard and Issues to figure it out.

Source:https://gistlog.co/JacobBennett/090369fbab0b31130b51
http://andrew.cool/blog/64/How-to-use-API-tokens-for-authentication-in-Laravel-5-2
Đồng bộ event từ app vào calendar system
Cũng giống như sử dụng sqlite trong android.Android cung cấp một api là Calendar Provider chấp nhận thêm,sửa xóa ,query,update
Calendar có rất nhiều loại theo từng thiết bị,vì thế trước tiên chúng ta phải tìm được calendar id bằng cách:
public static final String[] EVENT_PROJECTION = new String[]{
        CalendarContract.Calendars._ID,                           // 0        CalendarContract.Calendars.ACCOUNT_NAME,                  // 1        CalendarContract.Calendars.CALENDAR_DISPLAY_NAME,         // 2        CalendarContract.Calendars.OWNER_ACCOUNT                  // 3};
// The indices for the projection array above.private static final int PROJECTION_ID_INDEX = 0;
public static long[] getCalendarId(Context c) {
        Cursor cur = null;
        ContentResolver cr = c.getContentResolver();
        Uri uri = CalendarContract.Calendars.CONTENT_URI;
        // Submit the query and get a Cursor object back.       
        cur = cr.query(uri, EVENT_PROJECTION, null, null, null);
        // Get calendars name      
         String calendarNames[] = new String[cur.getCount()];
      // Get calendars id    
        long[] calendarId = new long[cur.getCount()];
        while (cur.moveToNext()) {
            calendarId[0] = cur.getLong(PROJECTION_ID_INDEX);
        }
        return calendarId;
    }

Adding Events
long calID = 3;=>id của calendar 
long startMillis = 0;
long endMillis = 0;    
Calendar beginTime = Calendar.getInstance();=>tạo 1 calendar lưu trữ time
beginTime
.set(2012, 9, 14, 7, 30);=>set thời gian
startMillis
= beginTime.getTimeInMillis();=>lấy ra timeMilis
Calendar endTime = Calendar.getInstance();
endTime
.set(2012, 9, 14, 8, 45);
endMillis
= endTime.getTimeInMillis();
ContentResolver cr = getContentResolver();=>khởi tạo dùng để gọi đến insert,update
ContentValues values = new ContentValues();=>lưu trữ data Event
values
.put(Events.DTSTART, startMillis);=>thời gian bắt đầu,sử dụng millistime
values
.put(Events.DTEND, endMillis);=>thời gian kết thúc,sử dụng millistime
values
.put(Events.TITLE, "Jazzercise");=>tên event
values
.put(Events.DESCRIPTION, "Group workout");=>mô tả event
values
.put(Events.CALENDAR_ID, calID);=>id của calendar,nên để chung 1 id,vd id=3
values
.put(Events.EVENT_TIMEZONE, "America/Los_Angeles");=>set timezone,hoặc để default->TimeZone.getDefault().getID();
Uri uri = cr.insert(Events.CONTENT_URI, values);=>thực hiện insert

// get the event ID that is the last element in the Uri
long eventID = Long.parseLong(uri.getLastPathSegment());=> sau khi insert sẽ nhận đc idEvent->dùng để update,delete,reminder,...Có thể dùng SharePreferences để lưu dữ

Updating Events

long eventID = 188;=>id event có được khi insert event

...

ContentResolver cr = getContentResolver();=>khai báo giúp thực hiện các hành động update,insert,delete

ContentValues values = new ContentValues();=>khai báo class thực hiện lưu trữ

Uri updateUri = null;

// The new title for the event

values.put(Events.TITLE, "Kickboxing");=>tiêu đề cần thay đổi 

updateUri = ContentUris.withAppendedId(Events.CONTENT_URI, eventID);=>update tại eventid nào
int rows = getContentResolver().update(updateUri, values, null, null);=>trả về 1 là thành công,trả về 0 là err

Log.i(DEBUG_TAG, "Rows updated: " + rows);  

Deleting Events


long eventID = 201;
...
ContentResolver cr = getContentResolver();

ContentValues values = new ContentValues();

Uri deleteUri = null;

deleteUri = ContentUris.withAppendedId(Events.CONTENT_URI, eventID);

int rows = getContentResolver().delete(deleteUri, null, null);

Log.i(DEBUG_TAG, "Rows deleted: " + rows);  
Google Android Screen and Icon size illustration
July 2014 EDIT: Android’s “L” design guidelines now supply templates in Adobe Illustrator, making it even harder for designers user to Photoshop or Fireworks. They don’t provide an answer for how you should crop and optimise your assets for the developer (I assume they’d rather you didn’t and just use their native stuff).
July 2014 EDIT: On consideration of comments from NexogenDev, I have removed the more explicit reference to 72dpi in the graphic above to “1dp = 1px” as this is a more literal starting point and probably better. My point was that Android supplied templates and assets tend to open by default in Photoshop as 72dpi, but dpi in general is misleading in this context.

Android screen resolution and density
I found it hard to know where to start designing for Android in Photoshop.
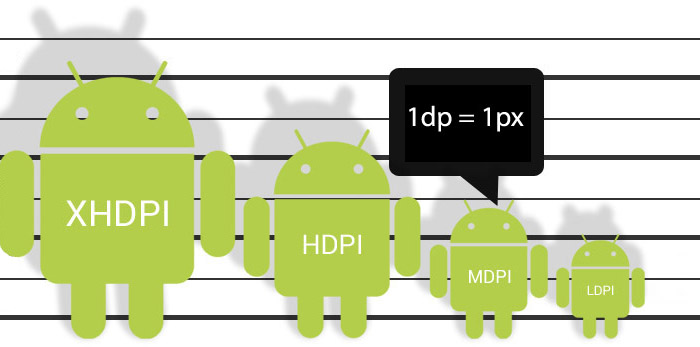
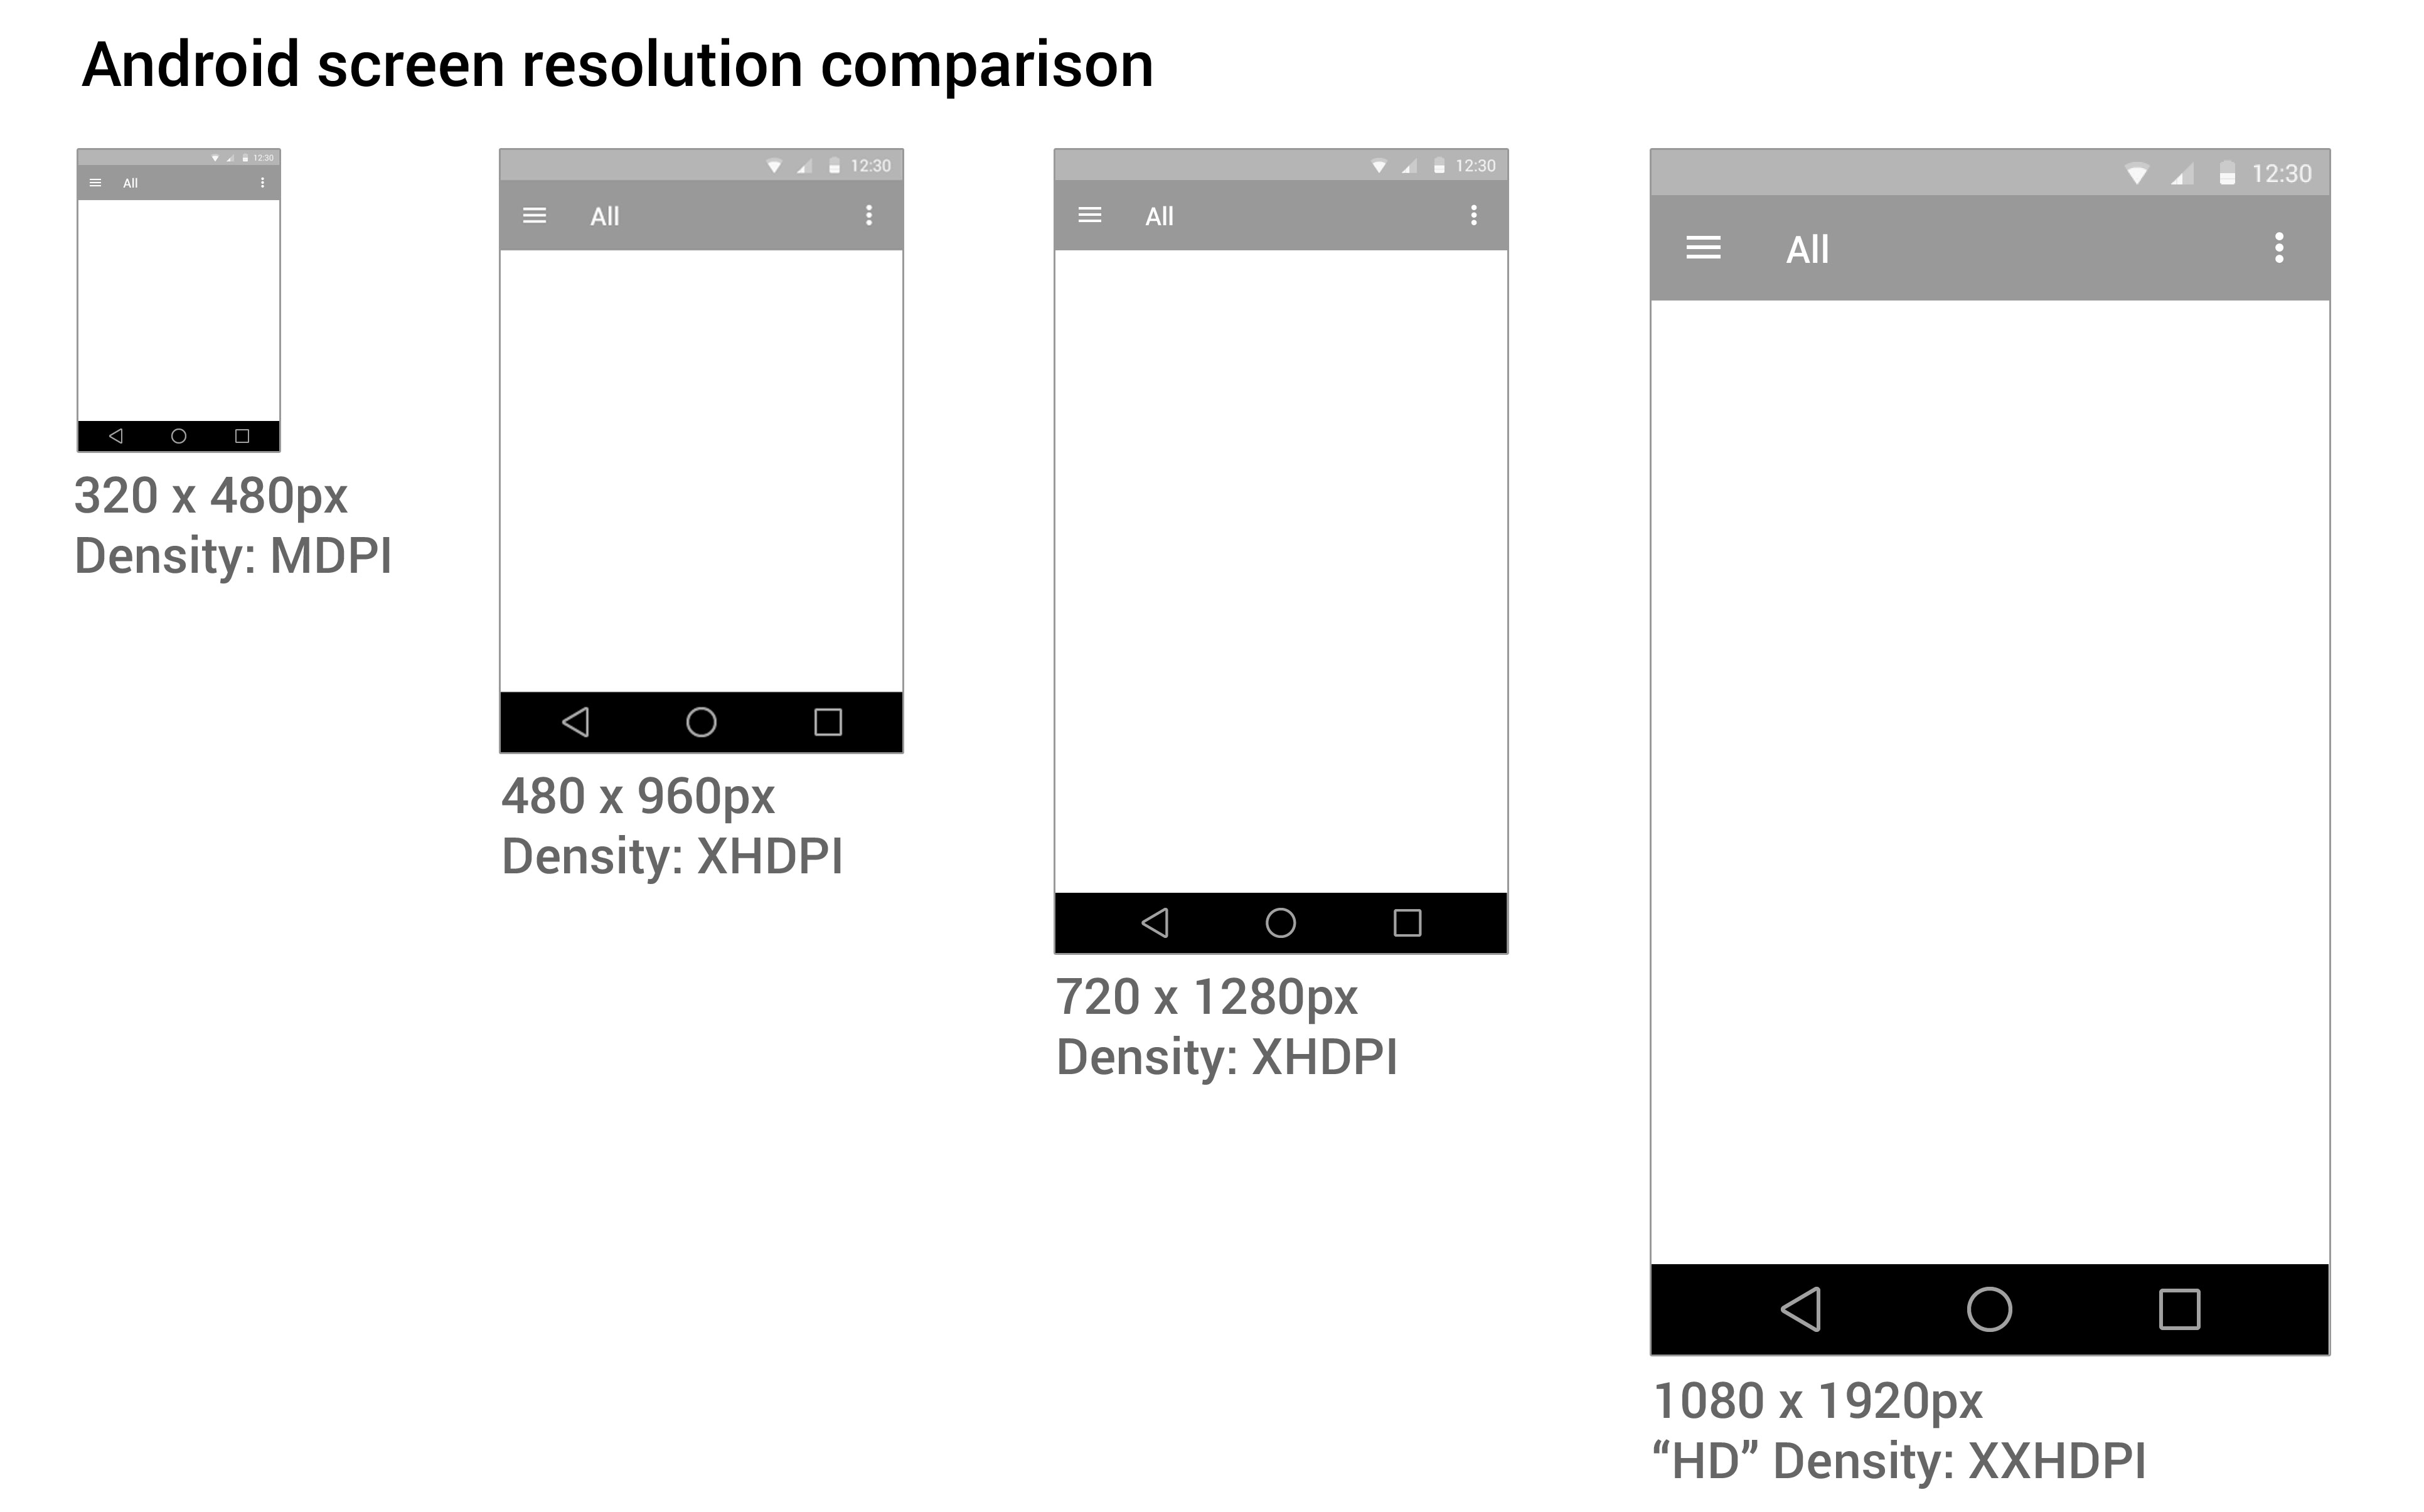
Google tries to help by providing extensive Android user Interface Design Guidelines.  There are many devices running Android that have different screen sizes and shapes. There are also different screen densities, which means the quality of the definition of the screen or how many pixels fit in the same sized area on the screen – e.g. medium screen density has 160 pixels in every inch on the device’s screen, whereas an extra high density screen has twice as many, 320 pixels, crammed in an inch. To cover the different densities you need to supply graphics and icons at various densities.
Creating a design that will work for all these devices can be daunting. You also need to create different density icons and graphics.

1. Minimum handsetscreen size

I started with a minimum mobile handset size screen first. Starting with the smallest and most limited screen size first makes sure your content and UI will fit, removing any features that aren’t completely necessary to the core purpose of the app. Then you can work out how your app will behave on larger and tablet sized screens. You need to decided if your app is going to stretch to fit larger screens, or if you’re going to have a completely different layout and design for tablet sized screens.

2. Photoshop image size

I choose to start with a small mobile handset and a small 7″ tablet screen as a base for design and then think of how that could scale elagantly.  You may need to create portrait and landscape versions if you plan on allowing users to change orientation.

3. Download Android design templates

If you are new to designing for Android, and are confused by dpi, I STRONGLY RECOMMEND you use native Android styling and assets, rather than doing a completely custom design at first.
It is important to keep the icons at the same proportion to maintain the correct “hit” area for the user’s finger.
downloads_stencils

4. Scale down

It’s easier to work at the higher pixel density, XXHDPI. It is always advisable to create icon art as vectors in “Smart Objects, or as “shapes” in Photoshop so they can be scaled up or down without loosing quality.
The benefit of working at XXHDPI is that you can be sure you are not loosing any quality.
XXHDPI – 300% – x3.o
XHDPI
 –  200% – x2.o
HDPI –  150% – x1.5
MDPI – 100% – x1.0
LDPI – 75% (don’t bother with this!) – 0.75
When using vectors, you may want to adjust your line art to tighten up any half pixels or it can look blurry at the edges (if you’re a perfectionist like me).

5. Workflow

  • Create you design PSD at XXHDPI
  • Crop out your graphic assets and icons as separate PSDs
  • Scale them down to the various densities: XHDPI, HDPI, MDPI
My method is to design one PSD, crop out the icons assets as PSDs, then scale them to the different densities. I often start with a PSD at XXHDPI or MDPI (providing my artwork is vector and can be scaled up or down), then I crop out the icons and assets out, then resize them.
The reason this is easier is that when you need to make design changes, you don’t have to change multiple PSDs.

What the frakk is a DP?

Here’s what I discovered after a few hours of scratching my head and moaning…
  1. “dp” is a magic, made-up measurement that only exists in the world of The Matrix & Tron.
  2. Android icons are 32dp x 32dp @ the medium density MDPI
  3. Android supply sample icons (Edit: they don’t any more the gits) and if you open an icon from the MDPI folder in Photoshop, the icon is 32px x 32px with “image size”.
  4. SO, in Photoshop:1dp = 1px @ MDPI – 100%
    1dp = 1.5px @ HDPI – 150%
    1dp = 2px @ XHDPI – 200%
    1dp = 3px @ XXHDPI – 300%
    1dp = 4px @ XXXHDPI – 400%
  5. It doesn’t matter what DPI you have set in PHOTOSHOP, it’s the canvas size (the number of pixels available) that counts.
Operating at a scale like Facebook's isn't easy. We have thousands of engineers working on hundreds of projects, moving as quickly as possible. With such a distributed engineering culture, not everyone can be an expert on every topic — nor should they be.
Over the past year, we've built Android frameworks to address that by abstracting away specific details like CPU, RAM, and network technology into broad segments both in analytics and code. This lets us leverage our existing expertise of the things that matter most for our product so that every engineer can do the right thing by default without needing to reason about the gritty details. Segmenting on the characteristics that matter most to us has been incredibly powerful in giving people a common language to use around the company.
Today we're happy to open-source two of those tools: Year Class and Connection Class, which help you smartly segment based on device and network performance in real time. You can use them to adjust feature performance at runtime, and to analyze how different interactions are network- or device-bound for performance.
Both tools are available on our GitHub page, and we'll be keeping the definitions up to date as time progresses and the market shifts. Check out facebook/device-year-class and facebook/network-connection-class, and give us your feedback!

Devices

About a year ago, we realized that hundreds of millions of people were accessing Facebook from Android phones, but we didn't actually know much about them. Some people consumed a lot, and some a little, but we weren't able to differentiate between demographics, phones, and networks. We had a hunch that the devices themselves were leading to the biggest swings in performance, but more than 10,000 models were in active use; we needed an easier way to segment people and analyze usage differences. Because we wanted to segment on something indicative of performance, we came up with a new concept called Year Class — essentially classifying phones by what year we would've considered their specs “high end.” Year Class was a simple mapping of RAM, CPU cores, and clock speed to a number, but it became an incredibly powerful tool for us to analyze patterns across the hundreds of millions of Android phones regularly accessing Facebook.
Now, with the Year Class library, you can figure out the year class for a particular device with one line of code:
int year = YearClass.get(getApplicationContext());
if (year >= 2013) {
    // Do advanced animation
} else if (year > 2010) {
    // Do simple animation
} else {
    // Phone too slow, don't do any animations
}
Despite the success of Year Class for analysis and feature customization, we noticed that metrics related to network transfer didn't have clear performance correlations. Much like phones, not all mobile networks are created equal. America's LTE networks would surely be different from Korea's, and even Wi-Fi around the world couldn't be considered predictably fast. We needed Connection Class.

Connections

Knowing that we wanted a way to equitably compare connection quality, we started by instrumenting bandwidth and latency around the world. We first modified Proxygen, our open source HTTP stack, to send round-trip times back in its HTTP headers to the client, and then we locally measured the transfer speeds of every response greater than 10 kb. Because bandwidth over a network radio is inherently noisy, we applied a low-pass filter to measurements and kept a running geometric mean in order to keep an accurate estimate throughout a session. In addition, we kept historical averages of country, carrier, and network technology so we could quickly adjust our estimate when the active network changed.
We found that the average speed for a given network technology, like HSPA, can vary by 5x between countries, and that the distribution of different technologies around the world varies significantly. In India, a country with limited broadband infrastructure, 2G remains in active use, while the U.S. and Mexico lean heavily on Wi-Fi connections.
We decided that bandwidth alone provided a good enough measure of quality for this project, and thus segmented it into four different buckets: 0 - 150, 150 - 550, 550 - 2000, and 2000+ kbps. Based on where someone's bandwidth measure is, we'll map them into one of the four Connection Classes — Poor, Moderate, Good, and Excellent. Each boundary is 3.6x the value of the previous one, which provides a margin to allow bandwidth to change during a session without constantly bouncing users between classes because of it.
To calculate a user's current Connection Class, you have to tell the library when you're starting a network request and when it's done. It will keep track of how many bytes were downloaded and how long it took. After enough samples have been gathered, it will broadcast an event with the user's current Connection Class.
// Implement
public interface ConnectionClassStateChangeListener {
  public void onBandwidthStateChange(ConnectionQuality bandwidthState);
}

// Initialize Connection Class
ConnectionClassManager ccManager = ConnectionClassManager.getInstance();
// Initialize Device Bandwidth Listener
DeviceBandwidthSampler sampler = DeviceBandwidthSampler.getInstance();
// Register Listener
ccManager.register(mListener);

// Later
sampler.startSampling();
// Download image or video
sampler.stopSampling();
We've been using Connection Class in our products and analytics for several months now. Along with Year Class, it provides helpful insights into how different usage behaviors on Facebook are driven by network performance, device performance, or both. It has helped us disable autoplay video on slow connections, automatically adjust image quality for your connection, tune our network parameters, adjust our image- and comment-fetching logic, and gain a better understanding of where to focus our efforts on improving network performance.
Check out the projects on GitHub and let us know what you think!
SocketIO là một giao thức websocket.
Các thư viện cần có:
  • Socket.IO-Client for Java-https://github.com/nkzawa/socket.io-client.java
  • engine.io-client-0.4.1-https://github.com/nkzawa/engine.io-client.java
  • Java-WebSocket-1.3.0-http://mvnrepository.com/artifact/org.java-websocket/Java-WebSocket/1.3.0
  • json-20140107 - http://mvnrepository.com/artifact/org.json/json/20140107

Để kết nối đến Nodejs sử dụng:
  private Socket mSocket;  
   {  
     try {  
       mSocket = IO.socket("http://chat.socket.io");  
     } catch (URISyntaxException e) {  
       throw new RuntimeException(e);  
     }  
   }  
Để lắng nghe một sự kiện từ phía server ta có thể sử dụng Socket.on:
Ở đây ta lắng nghe 2 sự kiện đó là khi connect thành công phía server và error:
  mSocket.on(Socket.EVENT_CONNECT_ERROR, onConnectError);  
mSocket.on(Socket.EVENT_CONNECT, onConnectSucsses);  
onConnectError và onConnectSucsses là hai callback được gọi khi kết nối socket:
Socket.EVENT_CONNECT_ERROR là key cần lắng nghe.quy định trên server

  private Emitter.Listener onConnectError = new Emitter.Listener() {  
     @Override  
     public void call(Object... args) {  
       getActivity().runOnUiThread(new Runnable() {  
         @Override  
         public void run() {  
           Toast.makeText(getActivity().getApplicationContext(),  
               R.string.error_connect, Toast.LENGTH_LONG).show();  
         }  
       });  
     }  
   };  
  private Emitter.Listener onConnectSucsses= new Emitter.Listener() {  
     @Override  
     public void call(Object... args) {  
       getActivity().runOnUiThread(new Runnable() {  
         @Override  
         public void run() {  
           Toast.makeText(getActivity().getApplicationContext(),  
               R.string.connect, Toast.LENGTH_LONG).show();  
         }  
       });  
     }  
   };  
Sau khi đã lắng nghe 2 sự kiện bạn sử dụng mSocket.connect(); để bắt đầu connect tới phía server
Tiếp theo là gửi một message lên server ta sử dụng Socket.emit:
  mSocket.emit("new message", message);  
Trong đó "new mesage" là key được lắng nghe phía server,message là value.
Value có thể là Object nguyên thủy(String,int,..) hoặc là một Object của bạn nhưng chú ý sử dụng JsonObject để gửi lên
Sau khi hoàn thành nhứ đóng kết nối và các sự kiện đang lắng nghe
 mSocket.disconnect();  
 mSocket.off(Socket.EVENT_CONNECT_ERROR, onConnectError);   
 mSocket.off(Socket.EVENT_CONNECT_TIMEOUT, onConnectError);  
 mSocket.off("new message", onNewMessage);